How far can we reasonably take a SIL 200 engine, using old school tuning, a little bit of knowledge and a lot of experience? Darrell Taylor finds out…
Having already run the stock 200 engine through a series of tests and minor adjustments in Part 1, and then addressing the necessary base-level upgrades in Part 2, we now look at a batch of tests which were carried out, to take the engine to the next level. When doing this it is important to get a fair comparison of results on the same day with similar conditions, which are both mechanically and environmentally influenced. The dyno has a ‘correction factor’ which is applied by the software, which takes readings of the room temperature, humidity and air pressure via a probe. This is because such factors effect engine performance, so if conditions one day are extremely good for power (like high air pressure) then a higher power reading will be displayed if a correction factor is not used.

However, a test done a week later with low air pressure may show 1bhp less. With no other changes the correction-factor in the software goes some way to balancing these changes out, to provide a fairer comparison between tests. The uncorrected reference figure is simply shown as 1.00 which means 100% of the actual power figure achieved will be displayed. So if the conditions in the dyno room force a change of reading via the correction factor software (which is fairly minor) it will often result in the correction-factor being a little lower at say 0.98 or a little higher at 1.05 for example. These figures are often displayed on dyno-graph printouts if you happen to spot them.
When trying to evaluate small changes it’s also important to a number of small items, in order to achieve consistent figures and results which are comparable. Tyre pressure was set at 30psi for all our tests, and it is also important to do a few ‘dummy runs’ first to allow the engine temperature to stabilize as the very first runs that are done on colder crankcases on air-cooled motors are often a little better. The strapping down of a scooter or the seated/non seated testing (or even different tester/operator weights) can make a change on some dyno systems, particularly those that have a poor knurling on the drum which causes lots of inaccuracies. But having done back-to-back tests on this system it displays no change although a constant seated dyno run was used throughout anyway.
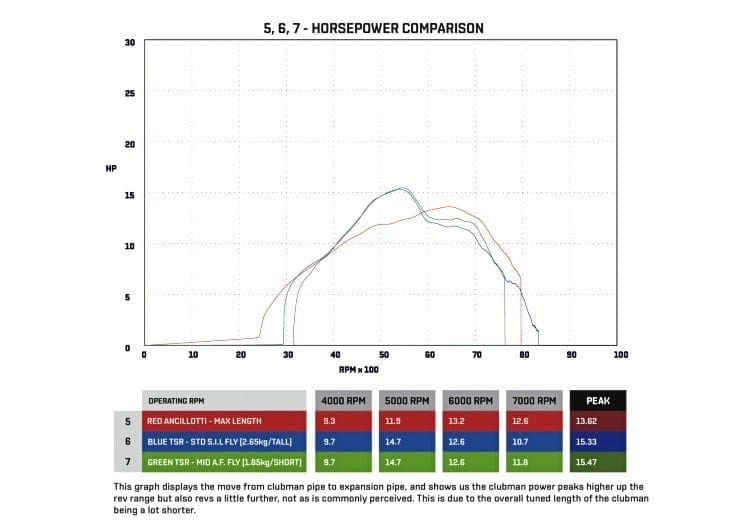
The first month’s tuning article left off with a test of the Ancillotti clubman pipe which had been lengthened on its slip joint, so to start the day with a baseline run I decided to test lengthening the header pipe even further to its maximum length on the slip joints (reading 5 in red: Ancillotti max length) this moved peak power down the rev range to 6400rpm and showed a power increase at 13.62bhp with 12.7lb-ft torque. The torque figure seeing the biggest jump as torque is always higher when bhp is made lower down the rpm range.
Next test is the interesting one — fitting an expansion pipe to see what it would achieve. The pipe fitted was the TSR Eva in its standard supplied form as I felt its long tuned length would work well, seeing as the previous clubman had responded so well to being lengthened. Fitting up the exhaust stub showed was an okay match to the SIL cylinder which was a bonus.
First impressions felt promising, in fact very promising… until the first problem struck, namely a very small touch of clutch slip from the standard SIL clutch assembly. This information becomes quite noteworthy as we now have a power/torque figure to help with the decision at what point a STD SIL clutch will need upgrading or replacing. Rather than pause now to change clutch plates, just when things were getting interesting, I decided to carry on with the test and gently built some heat into the plates by slowly building up the power and dumping the clutch repeatedly to scrub the oil film off.
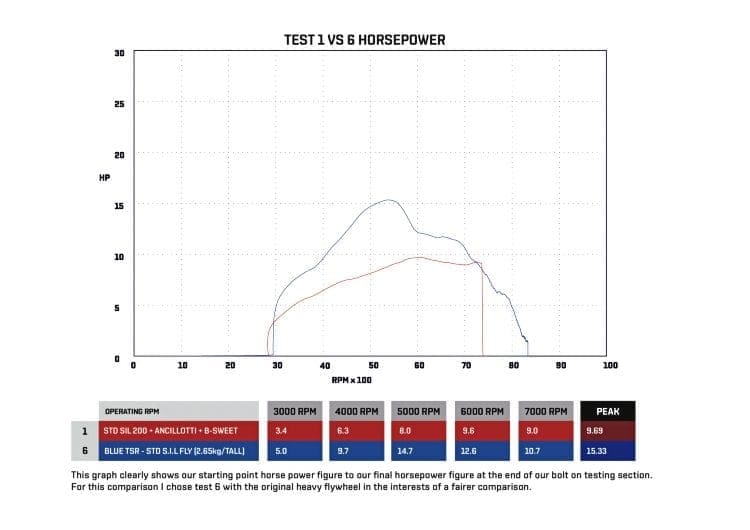
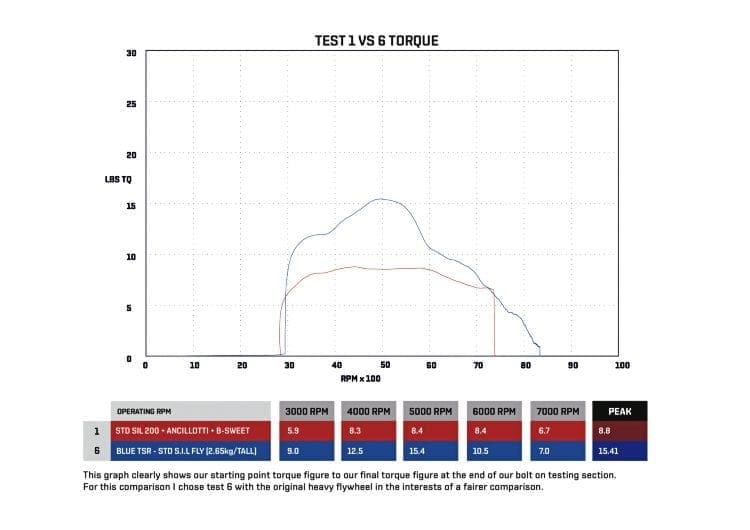
I didn’t want to change anything yet as it’s the last of the batch of tests which I’d call ‘bolt on or bolt off’ and knew the upgrades (which were covered in Part 2) would get done anyway. Now the dyno is set to record three runs in each batch, to allow the effects of heat on the case and pipe to build and stabilise, this generally sees power peak on the second run, and then stabilises on the third. The clutch still slipped a little on the first run but managed a second and third run with no apparent slip. The results were very pleasing as seen in graph test readings of 15.33bhp and 15.41tq, but interestingly it was at a very low 5400rpm hence why we have an almost matching power and torque figure. To recap on the motor’s spec, it’s a stock SIL 200cc motor using a stock carb which has been re-jetted to suit, running through a breathe-sweet type air filter. It has a compression increase and squish clearance reduction as a result of removing the stock head gasket, and an expansion pipe fitted. That’s some result as we are now in the realms of results seen from some aftermarket kits and around just 25% down on the most popular 225 kits, yet giving away 25cc to them!
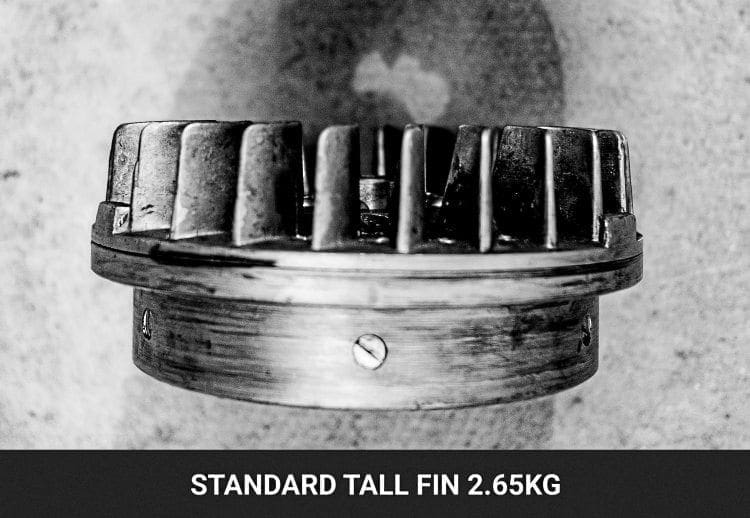
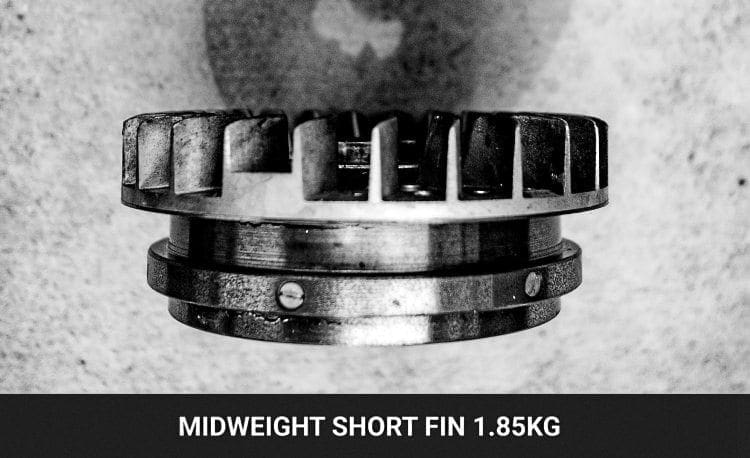
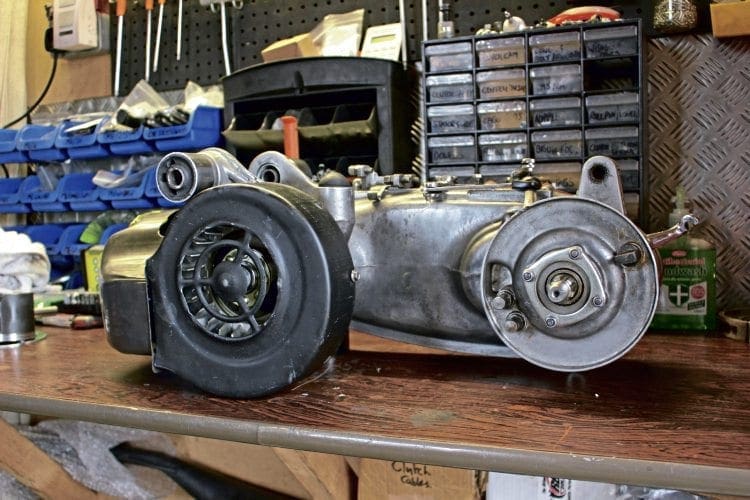
Next test was the removal of the original heavy/standard flywheel which weighed 2.65kg and has tall cooling fins, as can be seen in the pictures. I replaced it with the popular mid-weight version at 1.85kg which also has short cooling fins, to see how it performed. I had got the clutch slip temporarily fixed with a bit of scrubbing in and backed the cable right off too, to make sure the runs were accurate, and they were again fine on the later second and third runs. The result was quite interesting, as performance was very similar up to peak power (5400rpm) but from there to 7500rpm the lighter short-fin flywheel was around 1bhp up.
This suggests that with increasing rpm, either the air drag/resistance of the longer fans blades is increasing, or the extra weight is sapping the motors power. But in either case, at this spec, it’s of little benefit at all. The small improvement in the over-rev area will never be used on the road, as power has fallen to well below what it is usable, and rapidly drops away past 6000rpm. Although on a higher rpm set up it’s easy to see how and where a useful power improvement can be made.
Additional tests were done at this stage to both jetting and ignition timing to check if either optimised the new pipe further, but there were no further gains found at this stage. It would have been nice to try a different carb again with the expansion, but clutch slip was just being contained and any more improvement I feared would not be shown. Previous tests at this rpm showed the original carb to be fine though, so the bolt-on section comes to an end, with the overall results starting at 9.69bhp as supplied, to the final 15.33bhp and the original torque figure 8.8tq up to the final 15.41tq.
Time to drop the motor and do a touch of porting work. Stay tuned.
Words & photographs: Darrell Taylor
This article was taken from the July 2016 edition of Scootering, back issues available here: www.classicmagazines.co.uk/issue/SCO/year/2016

